This post contains affiliated links for your convenience. I only write about products I love and all thoughts and opinions expressed are my own. For more information see Legal.
When I taught elementary school art one of my favorite easy end-of-the-year, "I don't feel like writing a lesson plan" activities was scratch art. I'd buy Scratch Art paper in bulk and cut the pages in half and let the kids draw whatever they wanted for half an hour.
If you've never used Scratch Art paper before it is basically a black sheet of paper that when you scratch at the black top layer with a wooden stick, it reveals a colorful rainbow layer underneath. No mess, no clean up and always a crowd favorite. You can see why kids (and overworked/exhausted art teachers) might enjoy this activity.
Sometimes we would even make our own DIY Scratch Art Paper. Kids would color on a piece of paper with crayons, making sure the entire paper was covered with a nice thick layer of wax crayon. Then we would paint over it with black paint mixed with a little bit of dish soap and voila!

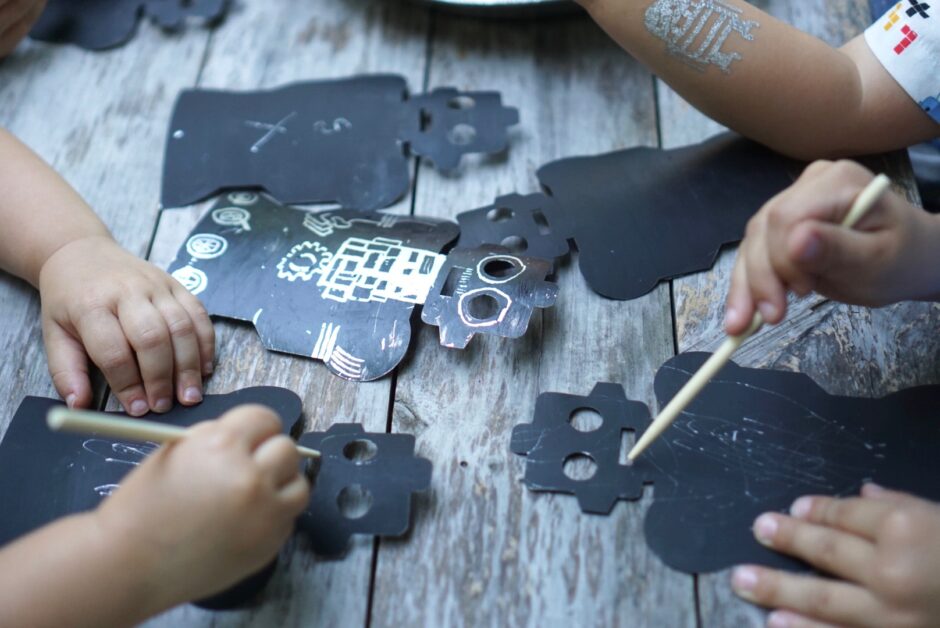
For my son Teddy's ROBOT 3.0 BIRTHDAY PARTY I wanted an easy, no-mess art activity for the kids. I saw these Scratch Art Robots but I really wanted them to be silver instead of rainbow (and they weren't Prime shipping...) so I set off to make my own. Now, I am the type of crazy person that would hand-cut 20 robots out of silver paper....BUT, luckily I just got a Cricut Explore Air 2. The Cricut machine made this project SO easy.
MATERIALS
- Cricut Machine (or large craft punch, or torturous hand-cutting)
- Glossy Cardstock Paper (like this Silver Foil Cardstock)
- Black Acrylic Paint
- Paint Brush
- Dish Soap
- Wooden Scratch Art Sticks
HOW TO MAKE DIY SCRATCH ART WITH CRICUT
- Choose a simple design image that doesn't have any skinny pieces that might break off. I made a robot out of simple shapes and welded them together. You can copy and paste the PNG file below if you want to make robots. If you wanted to make a different design create it using shapes or search for free png files.

2. Arrange your project so that several of your designs fit to a page. Load your cardstock paper into the machine. The paper MUST be sturdy and glossy, otherwise the paint won't scratch right. (The glossiness of the paper makes it so we don't need the wax crayon layer of a typical DIY Scratch Art paper, but I guess if you wanted to do the crayon layer you could use regular paper or cardstock. If you try it this way let me know how it turns out!)
3. Cut and remove your robots or other designs from your Cricut Mat.
4. Once your designs are cut, mix together black paint with a few drops of dish soap in a small container. Using a paint brush, cover the cardstock design with a thin layer of paint. Let dry.
5. Your scratch art cut-outs are ready to decorate. You can use a wooden stick like a pencil to draw different designs into the black paint. For the robots, I encouraged kids to add details like buttons, bolts, gadgets and patterns.
It is helpful to create an example with different types of lines and patterns to give the kids some ideas!
OTHER IDEAS FOR CRICUT SCRATCH ART
- Cut butterfly shapes
- Cut bookmark shape and add tassel
- Cut gift tag shapes
- Cut mask shapes
- Cut fish shapes from holographic cardstock and read The Rainbow Fish by Marcus Pfister.
- Cut into house shapes and read House in The Night by Susan Marie Swanson.
- Turn into ornaments with hole punch at the top
- Give your child stencils to use for scratching
SHOW US YOUR CRICUT SCRATCH ARTS!
Tag your photos of your DIY Scratch art papers and the masterpieces your child will make with them with @ureadyteddy and we'll share our favorites in our stories!

SHOP THIS POST